By Riya Gohil
Technique Name: Western Blot
Fun Rating: ![]()
Difficulty Rating: ![]()
What is the general purpose? Western Blots utilize gel electrophoresis to separate protein by size and use antibodies to detect specific proteins molecules within a mixture of various proteins.
Why do we use it? Western Blots are useful to detect the presence and amount of a specific protein of interest within a sample from, for instance, tissues or cells. Proteins are very important as they do most of the work in cells. They are the building blocks of cellular activity and thus they play critical roles in cell function and structure. Let’s say you are interested in studying Protein X because it can help treat a specific disease. You, as a researcher, may be interested in figuring out ways to make more of Protein X. Western blots can help you figure out if a treatment increases the production of Protein X in cells, thereby helping to treat the disease. Western blots help you visualize 1) the presence of a protein and 2) the relative quantity of that protein in a cell.
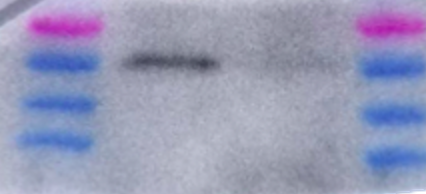
Western Blot depicting protein level reduction. Lanes 1 and 4 are molecular protein ladders to help visualize the size of protein bands. Lane 2 depicts a protein that is at a higher concentration of the same protein in Lane 3. This image serves to represent how Western Blots can be used to detect for protein levels within a cell. Courtesy of Riya Gohil.
How does it work? As mentioned above, western blotting is used to detect the presence and amount of a specific protein. There are several steps involved in this process including the sample preparation, gel electrophoresis, transfer, blocking, and antibody probing.
Sample Preparation
To prepare your western blot, you need to collect the components within the cell that contains the proteins. This is done by lysing, or breaking open, the cell. Once you have lysed your cell to collect the cellular mix of various proteins, you can start your western blot.
The first step in the Western Blot is to boil your mixture of proteins. This will denature, or unfold, all the proteins. Western Blots work best with linearized proteins to run through a gel during this gel electrophoresis step. Once the samples have boiled and your proteins are linearized, they are ready to be loaded on a gel.
Gel Electrophoresis
The gel used for Western Blots has wells embedded within them in order to load your mixture of proteins.
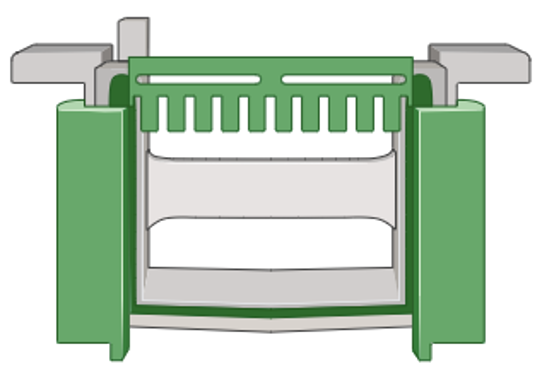
Gel Holder to hold gel. Created with Biorender.

Loading samples onto a gel. Created with Biorender
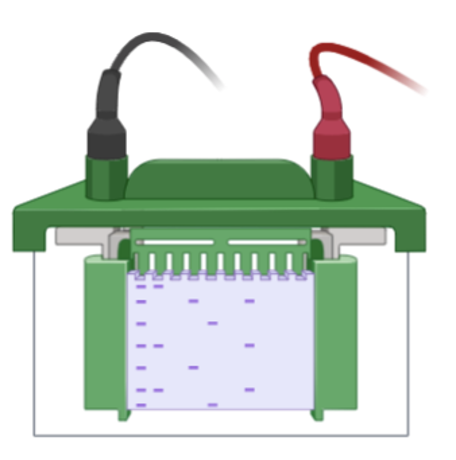
Once the gel is loaded with your mixture of proteins, you can connect the tank to a power source that will generate a current which pulls the proteins through the gel. The gel is made up of molecular sieves or doorways which restrict protein movement based on size. Smaller proteins for example will be able to fit through these “doors” much faster and therefore, will run down the gel quicker while larger, heavier proteins will travel down the gel slower.

Western Blotting apparatus connected to a power source. Created with Biorender.
Western Blot gel when it is done running. Created with Biorender.
Protein Transfer
Once the proteins within your mixture are separated by size, you need to make the proteins accessible to the antibody. Right now your proteins are sitting inside a gel and thus the antibodies will not be able to reach them. Therefore, they need to be transferred to an easily accessible surface known as a membrane. You are basically copying and pasting your proteins inside the gel on an open membrane that your antibody can access. Similar to the gel electrophoresis, this is done by introducing an electrical current. However, instead of pulling the proteins down the gel, the current is directed through the gel so that they can land on the membrane surface sitting next to it.
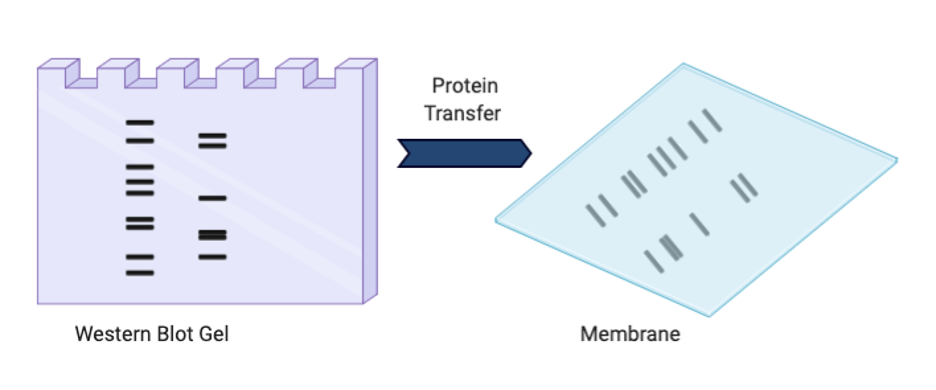
Image depicting protein transfer step. Protein within western blot gel will transfer onto the membrane. Image created with BioRender.
Blocking
Once the transfer is completed, you will now have a membrane with proteins sitting on top of it separated by size. The next important step is blocking. Blocking is when you coat the membrane with proteins that are not compatible with detection methods, such as antibodies. This prevents non-specific binding of the antibody to other proteins of interest. Non-fat dry milk is used for blocking since milk proteins are not detectable by antibodies. To block, you place your membrane in 5% non-fat dry milk and let it incubate at 4 degrees celsius for about an hour.
Primary Antibody
Another essential preparation step is to order an antibody specific to your protein of interest, called the primary antibody. This antibody is designed in a way to be able to bind to your specific protein, and therefore allow for you to detect the presence of your protein. If you do not use a primary antibody or use a primary antibody that has low protein specificity, you will detect numerous proteins from your western blot and not be able to determine accurately whether your protein of interest is present.
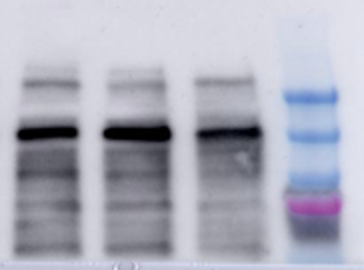
Image of a western blot gel using a non-specific antibody reveals multiple/smeary bands. Courtesy of Nicole Arruda.
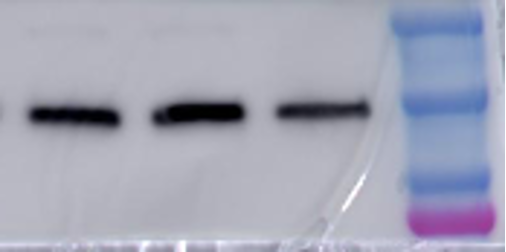
Image of a western blot gel using a specific antibody revealing clean recognition of protein of interest. Courtesy of Nicole Arruda.
The next step is to incubate the membrane with your primary antibody. This is done by placing your membrane in a solution of your primary antibody and let it incubate overnight. This will ensure that your primary antibody has enough time to find and bind only to your protein within the whole membrane.
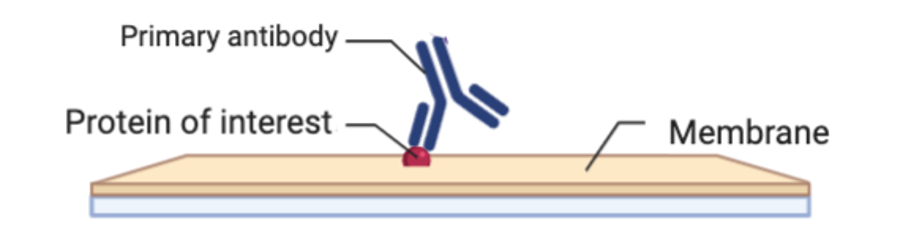
Primary antibody binding to protein of interest on a membrane. Created with Biorender.
Secondary Antibody/Detection
After the primary antibody incubation is done, you need to rinse off the membrane to get rid of any extra antibody that did not bind to anything. Now you need to incubate with the secondary antibody. This secondary antibody has a fluorescent or chemiluminescent tag that will bind to your primary antibody. This secondary antibody is typically linked with a compound called Horseradish peroxidase (HRP) that will be useful for detecting its presence. Chemiluminescence is a process that emits light to cause a reaction to occur. When the membrane now bound with primary and secondary antibodies is introduced to chemiluminescent light,the light will cleave, or cut, off the HRP from the secondary antibody releasing a burst of light that is detectable by an image machine. This machine can detect the emission of the light released by HRP cleavage off the secondary antibody in reference to where it is on the membrane. You thus get visualization of bands on your membrane where the primary antibody bound, which will be where your protein is. Therefore, you are able to detect for the presence or absence of your protein.
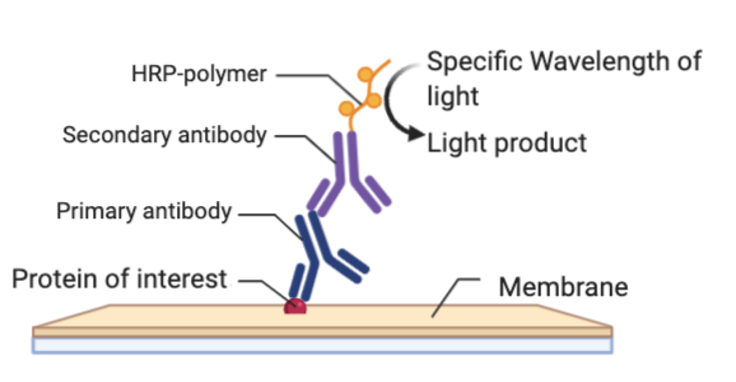
Schematic of antibody layering to detect a specific protein. Created with Biorender.